Introduction
Keymapping or Key binding is a process in which a user or a system can assign certain keys or commands to perform a particular task or commands. This can be quite useful in Vim as well as in other text editors to avoid some repetitive tasks and save time. In Vim this can be a great power to have for programmers as it can be really very flexible to set up for any programming language and it's environment.
In Vim, you can map a particular keystroke combination to trigger a command or any operation. You can also map a key in place of a weird key combination as well. You can map a key to integrate several commands and make it run at a single key or without much of a hassle. Key Mapping is quite powerful in Vim, only your creativity and imagination are the limits here. Vim can really shine in such aspects where the user has the freedom to tailor the editor and his development environment as per his/her needs.
Understanding the structure of Key binding
You can basically map a key depending on the current mode you are in. So that means you can have the same key mapped to different commands depending on the mode. That is really flexible and powerful. Vim allows you to basically map in almost every mode such as normal, insert, visual, command, and any other existing modes. Let us see what a basic key mapping looks like.
{mode}{attribute}map {key} {command}
The key mapping is broken down by adding the mode to map the key, an optional attribute to change/modify the way the mapping behaves and we finally have the key and the command pair. If you want to test a map you can temporarily map in the command mode using the syntax for the map command or if you want a permanent mapping, you can add the mappings in your vimrc file.
For a basic example let us map c to paste from the clipboard.
:map c "+p<CR>
The above command maps the "c" key in the normal/visual mode by default to paste the contents from the clipboard. It is just an example of how a basic key mapping or binding can be used to save your time and efforts. This is a very small example to demonstrate the concept of mapping in Vim but it scales quite fantastically and smoothly.
Now let's see how to view the mapping inside of the current vim buffer. We can simply type map, imap, or nmap in the command mode to view the mappings in the respective modes. This will display the maps which are currently present inside of the vim buffer, some might be temporary and most of them will be permanent.
:map
If you type in map being in the command mode, it will list out the maps. If you want to stop seeing the list just press q, and you will be back in the editor. You can also view the maps in the normal, visual, insert, or any other modes by prefixing n, v, i, or other modes with map.
Key Mapping in Modes
To map a key binding explicitly in the normal mode or any other modes, we have to prefix the word such as n for normal, v for visual or i for insert, and so on. The map will only work in the provided mode so the same keys may have several different maps depending on the current mode, but that can create a bit of confusion so avoid doing that. Let's map a key in the normal mode for example,
:nmap <C-s> :w<CR>
This is pretty bad for Vim beginners as it will spoil the real Vim experience of saving with :w, If you feel comfortable using Ctrl + s to save a file, the above map will be perfect. It will map the key Ctrl + s by pressing :w and then pressing enter to save changes to the file.
We can also map certain non-alphabetical keys such as CTRL, ALT, and others, it will help you in saving time to leave a mode and enter the mode again to edit the text. The following is a perfect example of such.
:imap <C-c> <ESC>"+pa
The above command is mapped in insert mode as the mode is set to insert at the command's beginning. The CTRL+c keys are mapped to first Escaping out of insert mode and then pasting from the "+ register which is the device clipboard here. In the end, we again get back to insert mode just to the right of the current cursor position. So, that is how we can map the keys to do the task and save a bit of time.
Adding Keymaps in vimrc file
So you can now map in any available modes in Vim and test it out in te=he current buffer, but if you notice when you close the buffer, your custom keymaps will not be functioning as they remain in the buffer until you close it. To make it permanent you need to type the exact map command to the vimrc file. Just don't add ":" as it is not a command mode, it should be only the pure command of the map.
nmap <C-s> :w<CR>
nmap <C-p> "+p
vmap <C-y> "+y
The above commands are pasted in the vimrc file. These keymaps once sourced will stay in permanently unless you remove them from the file.
Keymap Modifications
We can also add extra arguments to the keymaps such as noremap and remap and others. In remap, the keymap is recursive which means the key pair will get mapped to the keys mapped already somewhere. The keymap will redefine its map depending on the already existing maps. It is preferred to use noremap as it will not mix up the existing maps and have a fresh key binding. The mapping in Vim is quite versatile and there are quite a lot of modifications you could do to make your key binding feel and work according to you. So for further un depth understanding of modifications of keymap in Vim you can check out their documentation here.
Keymapping Usecases
Now, it's entirely up to you to make keymaps according to your preference and choice. You can use your creativity and knowledge to make powerful and efficient keymaps.
For some insights, I'd like to give in some cool and productive keymaps which I personally use very frequently in coding a particular programming language.
nmap <C-s> :w<CR>
nnoremap py :!python %<CR>                          " Python run macro
nnoremap cpp :!c++ % -o %:r && ./%:r <CR>           " C++ compile and run macro
nnoremap sh :!chmod +x % && source %<CR>            " Bash sourcing macro
nnoremap c :!clang % -o %:r && ./%:r <CR>           " C compile and run macro
nnoremap jv :!javac % && java %:r <CR>              " Java compile and run macro
The above mapping will run the file or compile and run the file you are currently editing in Vim. That is just an overview of how you can use key mappings in Vim for any programming language or tool. Vim allows you to modify and make the keys do the heavy lifting very easily and save a lot of time and frustration. This is how you implement DRY(don't repeat yourself) perfectly. I personally think this is just perfect to do certain things which are quite common and sometimes daunts you to do this again. So just have a look and play around with Vim keymaps, it is the power with which one can excel in saving time and energy. This is just flawless. OK, That was too much from my side.
Keymapping and Macros
Some Keymappings provided above are quite interesting for a person trying to understand macros and key binding. A macro is a bunch of commands packed in together to access it very efficiently, Not the exact definition, but still, it just means to simplify things and saves time. Keymapping is the same thing but to map with the keys.
From some snippets and explanations of VIm keymaps, it must be easier now for a beginner to understand Keymappings in Vim and how to customize accordingly.
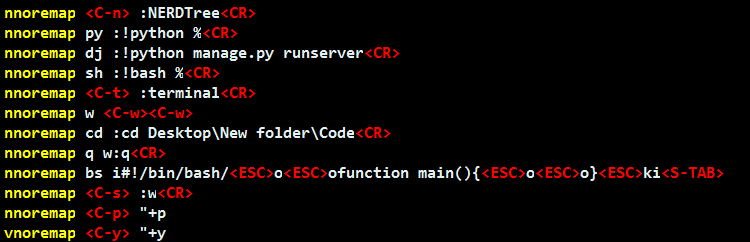
I hope it helped, Thank you for listening to my understanding of Vim keymapping. Below are some of my keymaps currently in vim for windows. Some of them were already shown in the code snippets.
So, Keymaps are quite powerful and can be a bit difficult to set up in a single try. Keep experimenting with keymaps and make Vim the powerhouse of productivity and customization. Happy Viming :)