Introduction
In this part of the series, we will be continuing with the concurrency features of golang with channels. In the last post, we covered the fundamentals of go routines and wait groups. By leveraging those understood concepts, we will explore channels to communicate the data between various go routines.
What are Channels
A golang Channel is like a pipe that lets goroutines communicate. It lets you pass values from one goroutine to another. Channels are typed i.e. you declare them with chan keyword followed by the type to be sent and received (e.g. chan int). The chan type specifies the type of values that will be passed through the channel. We will explore the detailed technicalities soon. Right now, we need to just focus on what problem is channels solving.
In the previous article, we worked with go routines and wait groups which allowed us to process tasks asynchronously. However, if we wanted to access the data in between the processes, we would have to tweak the core functionality or might require global variables, however, in real-world applications, the environment is quite constrained. We would require a way to communicate data between those go routines. Channels are made just for that(more than that), but in essence, it solves that exact problem.
package main

import (
	"fmt"
)

func main() {
	ch := make(chan string)
	defer close(ch)

	go func() {
		message := "Hello, Gophers!"
		ch <- message
	}()

	msg := <-ch
	fmt.Println(msg)
}
In the above code example, the channel ch is created of type string and a message is sent to the channel inside a go routine as ch <- message, and the message is retrieved from the channel as <-ch.
$ go run main.go

Hello, Gophers!
Channels have two key properties:
- Send and receive operations block until both sides are ready(i.e. there is a sender and a receiver for a channel). This allows goroutines to synchronize without explicit locks or condition variables.
- Channels are typed, so only values of the specified type can be sent and received. This provides type safety.
package main

import (
    "fmt"
)

func main() {
    ch := make(chan string)
    go func() {
        message := "Hello, Gophers!"
        ch <- message
    }()
    fmt.Println(<-ch)
    fmt.Println(<-ch)
}
In the same example, if we tried to add the second receiver i.e. <-ch, it would result in a deadlock/block forever since there is no second message sent into the channel. Only one value i.e. "Hello Gophers!" was sent as a message into the channel, and that was received by the first receiver as <-ch, however in the next receiver, there is no sender.
$ go run main.go

Hello, Gophers!
fatal error: all goroutines are asleep - deadlock!

goroutine 1 [chan receive]:
main.main()
        /home/meet/code/100-days-of-golang/scripts/channels/main.go:16 +0x125
exit status 2
To sum up the deadlock concept in unbuffered channels:
- The main goroutine is waiting at the second receive operation for a second message that will never arrive (was never sent).
- The anonymous goroutine is waiting for someone to read from the channel so it can proceed with sending the second message.
Buffered Channels
In Go, you can create both buffered and unbuffered channels. An unbuffered channel has no capacity to hold data, it relies on immediate communication between the sender and receiver. However, you can create a buffered channel by specifying a capacity when using the make function, like ch := make(chan int, 5) will create a channel with a capacity of 5 i.e. it can store a certain number of values without an immediate receiver. A buffered channel allows you to send multiple values to the channel without an immediate receiver, up to its capacity. After that, it will block until the receiver retrieves values.
package main

import (
	"fmt"
	"sync"
)

func main() {
	buffchan := make(chan int, 2)

	wg := sync.WaitGroup{}
	wg.Add(2)

	for i := 1; i <= 2; i++ {
		go func(n int) {
			buffchan <- n
			wg.Done()
		}(i)
	}

	wg.Wait()
	close(buffchan)

	for c := range buffchan {
		fmt.Println(c)
	}
}
$ go run channels.go
1
2

$ go run channels.go
2
1
In this code snippet, we create a buffered channel ch with a capacity of 2. We send two values to the channel, and even though there's no immediate receiver, the code doesn't block. If we were to send a third value, it would lead to a deadlock because there is no receiver to free up space in the buffer.
Closing Channels
Closing a channel is important to signal to the receiver that no more data will be sent. It's achieved using the built-in close function. After closing a channel, any further attempts to send data will result in a panic. On the receiving side, if a channel is closed and there's no more data to receive, the receive operation will yield the zero value for the channel's type.
package main

import (
	"fmt"
)

func main() {
	ch := make(chan int)

	go func() {
		for i := 1; i <= 5; i++ {
			ch <- i
		}
		close(ch)
	}()

	for num := range ch {
		fmt.Println("Received:", num)
	}
}
In this example, a goroutine sends numbers to the channel and then closes it. The main routine receives these numbers using a for-range loop. When the channel is closed and all values are received, the loop will terminate automatically. Keep in mind that only a sender can close the channel, to indicate the receiver to not wait for further values from the channel.
Select Statement for Channels
The select statement is used for handling multiple channels. There are a few operations that can be checked with a case statement in the select block.
|Case |Channel Operation| |---------|-----------------| | | | |Sending | chan <- value | | | | |Receiving| <- chan | | | |
So, we can either check if there is a sender or a receiver available for a channel with a case statement just like a switch statement.
package main

import (
	"fmt"
	"sync"
)

func sendMessage(ch chan string, message string, wg *sync.WaitGroup) {
	defer wg.Done()
	ch <- message
}

func main() {
	var wg sync.WaitGroup

	ch1 := make(chan string, 2)
	ch2 := make(chan string, 2)
	wg.Add(2)

	go sendMessage(ch1, "Hello, Gophers!", &wg)
	go sendMessage(ch2, "Hello, Hamsters!", &wg)

	go func() {
		defer wg.Done()
		wg.Wait()
		close(ch1)
		close(ch2)
	}()
	ch1 <- "new message to c1"
	ch2 <- "new message to c2"

	select {
	case <-ch1:
		fmt.Println("Received from ch1")
	case ch1 <- "new message to c1":
		fmt.Println("Sent to ch1")
	case <-ch2:
		fmt.Println("Received from ch2")
	case ch2 <- "new message to c2":
		fmt.Println("Sent to ch2")
	}
}
$ go run channels.go
Sent to ch1

$ go run simple.go
Received from ch1

$ go run simple.go
Received from ch2

$ go run simple.go
Sent to ch2

$ go run simple.go
Received from ch1
The order of the messages is not guaranteed, the operation which is performed first based on the go routine will be only logged.
In the simple example above, we have created two channels ch1 and ch2, and sent two messages to them using two go routines. The main routine then waits for the messages to be received from the channels. We close the channels when the sending is done and simply check for the 4 cases i.e. the send on channel 1, receive on channel 1, and similarly for channel 2. So, that is how we can use the select statement to check which operation is being performed on the different channels, and this forms the basis for the communication between channels. We get more ease in the flow while working with channels.
Below is an example to test which url or a web server is responding first to the request.
package main

import (
	"fmt"
	"net/http"
	"sync"
)

func pingGoogle(c chan string, wg *sync.WaitGroup) {
	defer wg.Done()
	res, _ := http.Get("http://google.com")
	c <- res.Status
}

func pingDuckDuckGo(c chan string, wg *sync.WaitGroup) {
	defer wg.Done()
	res, _ := http.Get("https://duckduckgo.com")
	c <- res.Status
}

func pingBraveSearch(c chan string, wg *sync.WaitGroup) {
	defer wg.Done()
	res, _ := http.Get("https://search.brave.com")
	c <- res.Status
}

func main() {
	gogChan := make(chan string)
	ddgChan := make(chan string)
	braveChan := make(chan string)

	var wg sync.WaitGroup
	wg.Add(3)

	go pingDuckDuckGo(ddgChan, &wg)
	go pingGoogle(gogChan, &wg)
	go pingBraveSearch(braveChan, &wg)

	openChannels := 3

	go func() {
		wg.Wait()
		close(gogChan)
		close(ddgChan)
		close(braveChan)
	}()

	for openChannels > 0 {
		select {
		case msg1, ok := <-gogChan:
			if !ok {
				openChannels--
			} else {
				fmt.Println("Google responded:", msg1)
			}
		case msg2, ok := <-ddgChan:
			if !ok {
				openChannels--
			} else {
				fmt.Println("DuckDuckGo responded:", msg2)
			}
		case msg3, ok := <-braveChan:
			if !ok {
				openChannels--
			} else {
				fmt.Println("BraveSearch responded:", msg3)
			}
		}
	}
}
The above example shows how to use a select statement to wait for multiple channels to be ready before proceeding with the next operation. With this example, we can get the channel that sent the response first i.e. which search engine in this case responded to the ping first. Just a bit exaggerated example but it helps in understanding the concept of the select statement.
$ go run select-chan.go

DuckDuckGo responded: 200 OK
Google responded: 200 OK
BraveSearch responded: 200 OK


$ go run select-chan.go

DuckDuckGo responded: 200 OK
BraveSearch responded: 200 OK
Google responded: 200 OK
Let's break each of the steps down:
pingDuckDuckGo(ddgChan, &wg)is a method which sends data to the channelddgChan.pingGoogle(gogChan, &wg)is a method that sends data to the channelgogChan.pingBraveSearch(braveChan, &wg)is a method that sends data to the channelbraveChan.- We wait for each go routine to finish using
wg.Wait()and close the channels. - Finally, we close the channels
gogChan,ddgChan, andbraveChanto pick up the data from the channel as<-chanwith the select case block. - The select case will pick the first channel that is ready to receive data. Hence we get the output based on the order of which the channel responded first.
- We use the
!okcondition to check if the channel is closed or not, we have aopenChannelsvariable to keep track of the number of open channels, if there are no channels open, we simply break out of the infinite loop.
Directional Channels
Channels can also be designated as "send-only" or "receive-only" to enforce certain communication patterns and enhance safety. This is done by specifying the direction when defining the channel type.
package main

import (
	"fmt"
	"sync"
)

func receiver(ch <-chan int, wg *sync.WaitGroup) {
	for i := range ch {
		fmt.Println("Received:", i)
	}
	wg.Done()
}

func sender(ch chan<- int, wg *sync.WaitGroup) {
	for i := 0; i < 10; i++ {
		fmt.Println("Sent:", i)
		ch <- i
	}
	close(ch)
	wg.Done()
}

func main() {
	ch := make(chan int)
	wg := sync.WaitGroup{}
	wg.Add(2)
	go receiver(ch, &wg)
	go sender(ch, &wg)
	wg.Wait()
}
In the above example, we have created a channel ch and sent 10 values to it using two-go routines. The main routine is waiting for the goroutines to finish before closing the channel. The sender sends values 0 through 9, and the receiver prints whenever a value is received. In the sender method, we only accept the channel to send data as chan<-, and in the receiver method, the channel parameter is set to only read from the channel as <-chan.
$ go run send-recv.go

Sent: 0
Received: 0
Sent: 1
Sent: 2
Received: 1
Received: 2
Sent: 3
Sent: 4
Received: 3
Received: 4
Sent: 5
Sent: 6
Received: 5
Received: 6
Sent: 7
Sent: 8
Received: 7
Received: 8
Sent: 9
Received: 9
When we define a parameter as a write-only channel means that the function can only send data into that channel. It cannot read data from it or close it. This pattern is helpful when you want to make sure that the function is solely responsible for producing data and not consuming or interacting with the channel's current state.
When we define a parameter as a read-only channel, it means that the function can only receive data from that channel. It cannot close the channel or send data into it. This pattern is useful when we want to ensure that the function only consumes data from the channel without modifying it or interfering with the sender's logic.
Additionally, the compiler will catch code trying to send on a read-only channel or receive from a write-only one.
Common Channel Usage Pattern
There are a variety of ways in which channels can be used in Go. In this section, we'll explore some of the most common patterns for using channels in Go. Some of the most useful and idiomatic channel usage patterns include pipelines, fan-in and fan-out, etc.
Async Await pattern for Channels
In Go, goroutines and channels enable an elegant async/await style. A goroutine can execute a task asynchronously, while the main thread awaits the result using a channel.
The async-await pattern in Go involves initiating multiple tasks concurrently, each with its own goroutine, and then awaiting their completion before proceeding. Channels are used to communicate between these goroutines, allowing them to work independently and provide results to the main routine when ready.
package main

import (
	"fmt"
	"net/http"
)

func fetchURL(url string, ch chan<- http.Response) {
	go func() {
		res, err := http.Get(url)
		if err != nil {
			panic(err)
		}
		defer res.Body.Close()
		ch <- *res
	}()
}

func task(name string) {
	fmt.Println("Task", name)
}

func main() {
	fmt.Println("Start")

	url := "http://google.com"

	respCh := make(chan http.Response)

	fetchURL(url, respCh)

	task("A")
	task("B")

	response := <-respCh
	fmt.Println("Response Status:", response.Status)

	fmt.Println("Done")
}
$ go run async.go
Start
Task A
Task B
Response Status: 200 OK
Done
In the above example, we have created a function fetchURL which takes a URL and a channel as an argument. The channel respCh is used to communicate between the goroutines. The function fires up a goroutine that fetches the request, we send a GET request to the provided URL and send the response to the provided channel. In the main function, we access the response by receiving the data from the channel as <-respCh. Before doing this, we can do any other task simultaneously, like task("A") and task("B") which just prints some string(it could be anything). But this should be before we pull in from the channel, anything after the access will be blocked i.e. will be executed sequentially.
Pipeline pattern for Channels
The pipeline pattern is used to chain together a sequence of processing stages, each stage consumes input, processes data, and passes the output to the next stage. This type of pattern can be achieved by chaining different channels from one go routine to another.
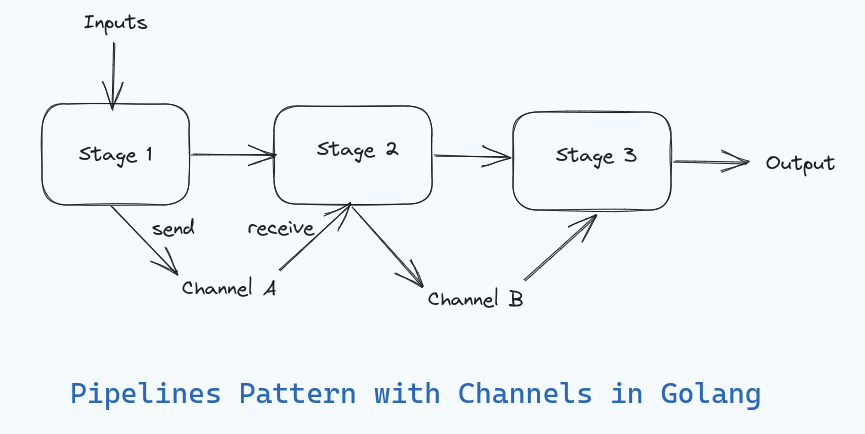
So, the pipeline pattern using channels in Go, data flows sequentially through multiple stages: Stage 1 reads input and sends to Channel A, Stage 2 receives from Channel A and sends to Channel B, and Stage 3 receives from Channel B and produces the final output.
package main

import (
	"fmt"
	"sync"
)

func generate(nums []int, out chan<- int, wg *sync.WaitGroup) {
	fmt.Println("Stage 1")
	for _, n := range nums {
		fmt.Println("Number:", n)
		out <- n
	}
	close(out)
	wg.Done()
}

func square(in <-chan int, out chan<- int, wg *sync.WaitGroup) {
	fmt.Println("Stage 2")
	for n := range in {
		sq := n * n
		fmt.Println("Square:", sq)
		out <- sq
	}
	close(out)
	wg.Done()
}

func print(in <-chan int, wg *sync.WaitGroup) {
	for n := range in {
		fmt.Println(n)
	}
	wg.Done()
}

func main() {
	input := []int{1, 2, 3, 4, 5}

	var wg sync.WaitGroup
	wg.Add(3)

	stage1 := make(chan int)
	stage2 := make(chan int)

	go generate(input, stage1, &wg)

	go square(stage1, stage2, &wg)

	go print(stage2, &wg)

	wg.Wait()
}
In the above example, we have created a sequence of processing stages, each stage consumes input, processes data, and passes the output to the next stage. We can consider the functions generate, square, and print as stages 1, 2, and 3 respectively.
- The generate function, takes in the input as a slice of integers, an unbuffered channel, and the waitgroup b reference, the function basically iterates over the numbers in the slice and sends it to the channel provided in the parameters.
- The square function takes in the stage1 channel that the channel from the stage1, as well as its own channel as
stage2(remember thestage1channel has sent the numbers via the generating function). - The square function then iterates over the number sent from the channel
stage1asinand squares it and sends it to the channel provided asstage2as theoutchannel. - The print function takes in the stage2 channel as an argument and iterates over the number sent from the channel
stage2and prints it.
$ go run pipeline.go
Stage 1
Number: 1
Stage 2
Square: 1
1
Number: 2
Number: 3
Square: 4
Square: 9
Number: 4
4
9
Square: 16
16
Number: 5
Square: 25
25
So, we can see the order of the execution, both the pipelines started synchronously, However, they perform the operation only when the data is sent from the previous channel. We first print the number from the generate function, then print the squared value in the square function, and finally print it as Square: value in the print function.
Fan-In pattern for Channels
The Fan-In pattern is used for combining data from multiple sources into a single stream for unified processing, often using a shared data structure to aggregate the data. We can create the fan-in pattern by merging multiple input channels into a single output channel.
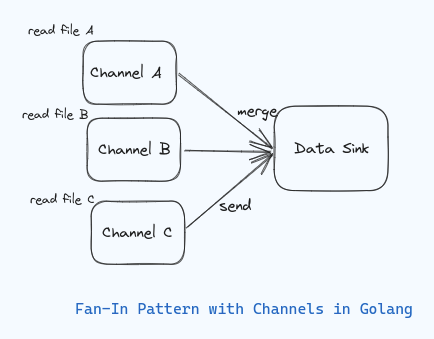
The fan-in pattern is when multiple input channels (A, B, C) are read concurrently, and their data is merged into a single output channel (M).
package main

import (
	"fmt"
	"io/ioutil"
	"sync"
)

func readFile(file string, ch chan<- string) {
	content, _ := ioutil.ReadFile(file)
	fmt.Println("Reading from", file, "as :: ", string(content))
	ch <- string(content)
	close(ch)
}

func merge(chs ...<-chan string) string {
	var wg sync.WaitGroup
	out := ""

	for _, ch := range chs {
		wg.Add(1)
		go func(c <-chan string) {
			for s := range c {
				out += s
			}
			wg.Done()
		}(ch)
	}

	wg.Wait()
	return out
}

func main() {
	ch1 := make(chan string)
	ch2 := make(chan string)

	go readFile("data/f1.txt", ch1)
	go readFile("data/f2.txt", ch2)

	merged := merge(ch1, ch2)

	fmt.Println(merged)
}
In the above example, the readFile function reads the contents of the file and sends it to the channels ch1 and ch2 from different go routines. The readFile takes in the channel as send only channel which reads the file and sends the content to the channel as ch <- string(content). The merge function takes in 2 it can also be n number of channels to parse from as indicated as ...<-chan, it iterates over each channel, and for each channel, it reads the contents, and appends as a single string.
$ go run fan-in.go

Reading from data/f1.txt as ::  This is from file 1
Reading from data/f2.txt as ::  This is from file 2

This is from file 1
This is from file 2


$ go run fan-in.go
Reading from data/f2.txt as ::  This is from file 2
Reading from data/f1.txt as ::  This is from file 1

This is from file 2
This is from file 1
So, this is how the fan-in pattern works, We create multiple channels and combine the results into a single stream of data(in this example a single string).
Fan-Out Pattern for Channels
The Fan-Out pattern involves taking data from a single source and distributing it to multiple workers or processing units for parallel or concurrent handling. Fan-out design splits an input channel into multiple output channels, it is used to distribute branches of work or data across concurrent processes.

The fan-out pattern is when data from a single input channel (A) is distributed to multiple worker channels (X, Y, Z) for parallel processing.
package main

import (
	"fmt"
	"os"
	"sync"
)

func readFile(file string, ch chan<- string, wg *sync.WaitGroup) {
	defer wg.Done()

	content, err := os.ReadFile(file)
	if err != nil {
		fmt.Printf("Error reading from %s: %v
", file, err)
		return
	}

	ch <- string(content)
}

func main() {
	files := []string{"data/f1.txt", "data/f2.txt"}

	var wg sync.WaitGroup
	ch := make(chan string)

	for _, f := range files {
		wg.Add(1)
		go readFile(f, ch, &wg)
	}

	go func() {
		wg.Wait()
		close(ch)
	}()

	var fileData []string
	for content := range ch {
		fileData = append(fileData, content)
	}

	fmt.Printf("Read %d files
", len(fileData))
	fmt.Printf("Contents:
%s", fileData)
}
In the above example, we create a single channel ch as our single source, we loop over all the files, and create go routines calling the readFile function. The readFile function takes in the filename, channel, and the WaitGroup reference, the function reads the file and sends the content to the channel as ch <- content. The readFile is called concurrently for all the files, Here we have done a fan-out of the task into multiple go routines, then in the main function, we iterate over the channel and receive the content.
$ go run fan-out.go

Read 2 files
Contents:
[This is from file 2
 This is from file 1
]


$ go run fan-out.go

Read 2 files
Contents:
[This is from file 1
 This is from file 2
]
Here's a brief summary of the fan-out pattern from the example provided:
- Multiple files are read concurrently using goroutines. This "fans out" the work.
- The
readFilefunction runs in a goroutine to process each file separately. - WaitGroup coordinates the goroutines.
- A shared channel ch collects the results from each goroutine.
- The main goroutine reads from the channel and aggregates the results.
- Channel is closed and ranged over to collect results cleanly.
I have a few more patterns to demonstrate that have been provided in the GitHub on the 100 days of Golang repository.
That's it from the 31st part of the series, all the source code for the examples are linked in the GitHub on the 100 days of Golang repository.
References
Conclusion
So, from this part of the series, we were able to understand the fundamentals of channels in golang. By using the core concepts from the previous posts like go routines and wait groups, we were able to work with channels in golang. We wrote a few examples for different patterns using concurrency concepts with channels. Patterns like pipelines, fan-in, fan-out, async, and some usage of select statements for channels were explored in this section.
Hopefully, you found this section helpful, if you have any comments or feedback, please let me know in the comments section or on my social handles. Thank you for reading. Happy Coding :)