Introduction
After learning the basics of views and URLs, we can now move on to the next concept i.e. Templates. In Django, Templates are quite an important component for the application as it acts as the frontend for the web application. With the help of templates and some features provided by Django, it becomes very intuitive and simple to make dynamic web content.
In this part, we understand what are templates and what is the way to render them.
What are Templates
Templates are simply a html document or kind of a wireframe for content to be displayed for the web app. Templates allow us to render some more relevant pieces of data rather than simple text HTTP responses as we did earlier. We can even re-use certain components of a template in other using the Django Templating Language (more on this later).
So, using HTML templates, we can write a complete Webpage. If you are unfamiliar with HTML, you can check out the basics of HTML with this playlist.
Even If you are not familiar with HTML, this tutorial might be quite basic and not overwhelm you with all the tags.
Creating Templates
To create a Template, we can write a simple HTML document like the below:
Create a folder templates in the base folder, inside the templates folder, create a file index.html
templates\index.html
    Django Blog


    Hello, World!
This is a simple HTML template, with the <h1> tags. As Django is a framework, there is a standard for storing all the templates for the project and application. There are a couple of standard of options:
- One of which is creating a
templatesfolder in the root folder as discussed earlier, also we need to modify theproject_name/settings.pyfile.
Inside the settings.py file, we need to locate the TEMPLATES section and modify as below:
import os

TEMPLATES = [
    {
        'BACKEND': 'django.template.backends.django.DjangoTemplates',
        'DIRS': [os.path.join(BASE_DIR, 'templates'),],
        'APP_DIRS': True,
        'OPTIONS': {
            'context_processors': [
                'django.template.context_processors.debug',
                'django.template.context_processors.request',
                'django.contrib.auth.context_processors.auth',
                'django.contrib.messages.context_processors.messages',
            ],
        },
    },
]
In this snippet, we have changed the DIRS option to search the templates in the folder templates in the root directory.
- The other standard is creating a templates folder in each application.
We can create the templates folder in each application instead of a single folder.
Rendering Templates
After creating a template and making the required settings to make sure Django is able to pick up those templates, we need to work with views and URLs to actually render those templates.
There are a couple of ways to render templates in Django and some of them are discussed below:
Using TemplateView
TemplateView is a class which is comes with django.views.generic library. This class allows us to render a template by providing in the name of the template, arguments or variables to be parsed, and so on.
The simplest way to render a template is by the following way:
from django.contrib import admin
from django.urls import path, include

from django.views.generic import TemplateView

urlpatterns = [
    path('admin/', admin.site.urls),
    path('', TemplateView.as_view(template_name="index.html"), name="index"),
]
We need to import the TemplateView from the django.core.generic so as to use the class for rendering the template.
The TemplateView class takes in a couple of arguments, we'll use the template_name as an argument that takes in the name of the template. Here, we use the index.html as the template which we created earlier. We don't need to specify the entire path to the template as we make modifications in the settings.py file to pick the template from the mentioned directory. We use as_view function to load the class as a function/view.
Activate the virtual environment for the proper functioning of the project.
After activating the virtual environment we can run the server as follows:
python manage.py runserver
We can now see the following output and thus, we are now rendering a simple HTML template in Django.
Using render
We can also use the render function from django.shortcuts to simply render a template. But we will create a Python function or a View to actually render the template. So, we'll create a View-URL map as we created in the previous part.
Firstly, let's create a view function in the post/views.py file, more generally (app_name/views.py file). Firstly, we need to import the render function from django.shortcuts and then return the function call of render.
from django.shortcuts import render

def home(request):
    return render(request,'index.html')
And in the URLs, we'll create a different pattern like for e.g. 'home/'
from django.urls import path
from post import views

urlpatterns=[
        path('home/',views.home,name="home"),
        ]
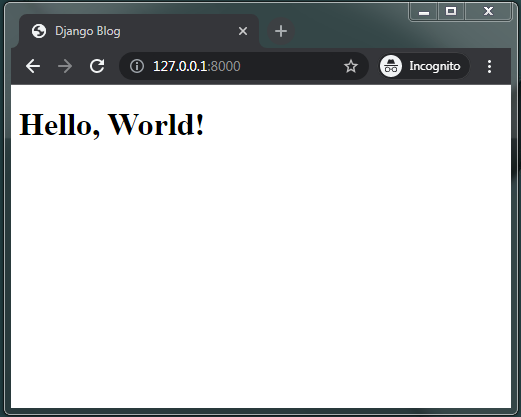
So, after creating the View-URL map and making sure the URL of the app is loaded in the project URLs, we can see the result as a simple HTML template.

Django Templating Language
The Django Templating Language is Django's way of making templates more dynamic and easy to write dynamic web applications. We'll take a brief look at what we can do with this type of Templating Language in Django.
Variables
This is the most common use case for the Django Templating Language/Engine as we can use the variables from the Backend and inject it in the template. We can parse the variable into the template by the syntax : {{ variable_name " }}}}
To show its use cases, we can declare a variable in a view and then parse it in the Template. Though it is not dynamic right now we can later on fetch values from the database and store them in the form of variables in our views.
templates/home.html
    Django Blog


    Hello, {{ name }}
post/views.py
from django.shortcuts import render

def variable_demo(request):
    name = "Kevin"
    return render(request, 'home.html', {'name':name})
    #The name can be anything, like a database query object, form detail, etc
As we can see the variable in views is passed as a dictionary in python. The reference key along with a value of the variable as the name of the variable. We will use the key in the templates to parse the value of the variable.
post/urls.py
from django.urls import path
from post import views

urlpatterns=[
        path('home/',views.home,name="home"),
        path('vardemo/',views.variable_demo, name="var"),
        ]
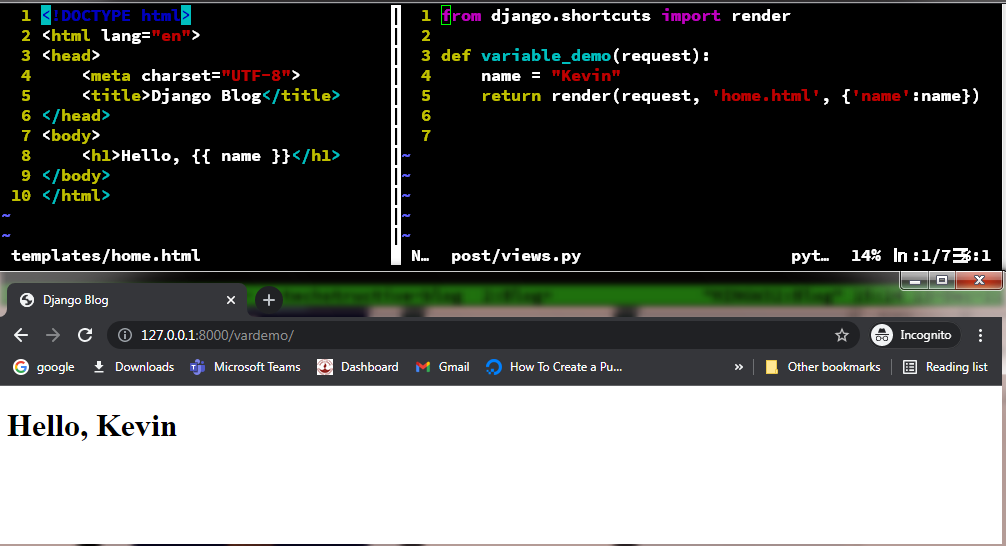
As we can see, we were able to load the variable into the template using the Django Templating Engine.
Conditional statement
We can even use the conditional statement in the Template using a very simple syntax. We can use {% if condition" }} %} to use certain special kinds of blocks in the Template. We need to end those blocks as well using the syntax {% endif %}, here if can be other blocks which we'll explore ahead.
To create a basic if condition in the template, we can understand with the following example.
app_name/views.py
from django.shortcuts import render
from random import randint

def if_demo(request):
   number = randint(1,10)
   return render(request, 'if_else.html', {'num':number})
Here, we have used the key name as num indicating we can give different names to the key which needs to be used in the template to render the values.
app_name/urls.py
from django.urls import path
from post import views

urlpatterns = [
        path('if/', views.if_demo, name="ifdemo"),
        ]
templates/if_else.html
    Django Blog


    {{ num }}
    {% if num > 5 %}
        It's Greater then 5
    {% elif num == 5 %}
        It's five!
    {% else %}
        It's less than 5
    {% endif %}

So, as we can see that, we can use the if-else conditions in the template and that is already powerful. This can be a bit messy as to handle mathematical operations or conditions into a single condition. This can really be used for really large datasets that can be shimmed down to really less coding and also improve readability.
For loop
Now, the most crucial component of the Django templating language is the loops. We can actually iterate over objects/lists in the template. This becomes a huge concept for actually making a dynamic web application. We n\might want to iterate over all the entries in a database, or any other form of data which can make the app a lot dynamic and feel real-time.
The syntax of for loop is almost similar to the if-else condition. We just replace the condition with the iterator and the list/object from the view context. {% for i in list %}, also end the for loop like {% endfor %}.
app_name/views.py
from django.shortcuts import render

def for_demo(request):
    sports = ('football', 'cricket', 'volleyball', 'hockey', 'basketball')
    return render(request, 'for.html', {'sport_list': sports})
We have created a simple Python list called sports and we parse them to the template using a dictionary object, sport_list as the key for storing the value of the sports list.
app_name/urls.py
from django.urls import path
from post import views

urlpatterns = [
        path('for/', views.for_demo, name="fordemo"),
        ]
templates/for.html
Django Blog
{% for sport in sport_list %}
- {{ sport }}
{% endfor %}

We have used simple for loop in Pythonic syntax, we use an iterator in this case, sport acts as an iterator. We use this to store values one by one from the list sport_list which was earlier passed in the views as a key in the dictionary.
Hence, this is quite scalable and used to fetch the objects/entries in the database and hence making it a lot easier to make a dynamic web application faster.
Template Inheritance
So, far we have seen that we need to create the base template again and again like all the basic HTML elements, title, and all the basic structure. But what if, we can reuse a specific template in another and extend the functionality of that template into a new one. This avoids the redundancy of writing the entire basic template or the layout of a web app over and over again.
To do that, Django has the Template inheritance. We can use a template as its basic layout or a specific component in the web application. Again, similar to the for, if-else blocks the syntax for inheriting a template is quite similar.
Take, for example, the home.html which consisted of only a <h1> tag in it. We can use this kind of template in other templates to really make it the home page. For that, we first need to enclose the template in a block, which is what allows us to use it in other templates.
To create a block, we simply need to write the following syntax before the component which we do not want in other templates:
templates/home.html
    Django Blog


    Hello, World!
    {% block body %}
    This is not going to get inherited
    {% endblock %}
    This will be inherited
In this we have used the blocks with a name like body as {% block body %} this can be anything you like. We end the block with the similar syntax as the for/if blocks as {% endblock %}. Anything in between the blocks i.e block block_name and endblock is not inherited i.e it is unique to this template.
We will see how we can use this template in other templates. We will actually extend this template and use the blocks to render the content in the template.
templates/if_else.html
{% extends 'home.html' %}
{% block body %}
    {{ num }}
    {% if num > 5 %}
    It's Greater then 5
    {% elif num == 5 %}
    It's five!
    {% else %}
    It's less than 5
    {% endif %}
{% endblock %}
So, we first say to Django to extend the home template i.e. the Django will load the blocks from this template only, remember it will just load and not use the blocks until we explicitly tell it to.
To use the blocks or kind of plug in the template content in the if_else.html or any other template, we need to again call the blocks. Here, we need to write the content inside the blocks to properly parse the blocks as this is an HTML template. The order of opening and closing elements do matter.
So, when we say endblock the last part of the base template is loaded i.e. the closing body and html tags. This is like plugging the template as it is before and after the block body.
app_name/views.py
from django.shortcuts import render

def home(request):
    return render(request, 'home.html')

from random import randint

def if_demo(request):
   number = randint(1,10)
   return render(request, 'if_else.html', {'num':number})
app_name/urls.py
from django.urls import path
from post import views

urlpatterns = [
        path('', views.home, name="home"),
        path('if/', views.if_demo, name="ifdemo"),
        ]


The above gif illustrates the example in a neat way. The block is loaded from the given template as the extended template and hence it plugs the block into the frame of the template.
Conclusion
So, from this part of the series, we were able to understand the concept of Templates in Django, we were able to use variables, loops, conditional statements, and template inheriting in a Django application. In the next part, we'll try to touch up with the static files and see how to properly structure and configure them.
Thank you for reading, if you didn't understand any of the examples, please let me know, I'll be happy to share the code. Happy Coding :)