Introduction
After understanding the admin section and setting up a database, we can finally move on to the CRUD API in Django. We will create a API in pure Django with Model Form, Class Based Views and templates. We will go in two parts in this section, first revising the workflow of the app creation and setup, the next part all about CRUD API. We'll dive into a lot of familiar topics and concepts from previous parts but there are is still a lot to learn beyond the basics.
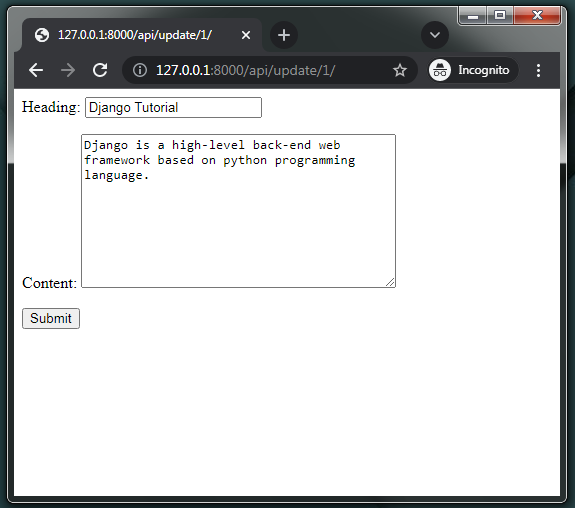
The following is the demonstration of the CRUD API we will be making in this section:

Quickly Setting up an app
We have seen how to create an app in the folder structure part of the series, after that we have created all the components namely the views, urls, templates, etc in distinct parts. In this article, we will create an app together in a single part. We'll discuss all the process in short because its important to get the workflow of Django to ease the actual coding process. Let's dive in the part one of this section of creating a CRUD API i.e. to set up an app.
Creating App
To quickly set up an application, we need to execute an command so that python under the hood creates a folder for an app in the current Django project.
python manage.py startapp api
This will set up an folder api in the base directory of current django project. Now, we'll need to configure the Django settings for the project to pick up this app while running the server, making any migrations or any other project level process.
Registering the App-name in settings
Simply append the name of the app in a string in the INSTALLED_APPS list inside the settings.py file.
# project_name / settings.py

# Application definition

INSTALLED_APPS = [
    'django.contrib.admin',
    'django.contrib.auth',
    'django.contrib.contenttypes',
    'django.contrib.sessions',
    'django.contrib.messages',
    'django.contrib.staticfiles',

    'api',
]
Setting up the URLS
We need to create a urls.py file for the api app and link it in the main project's URLs.
# app-name / urls.py

from django.urls import path

urlpatterns = [

]
We'll keep the url patterns empty but after setting and configuring the project and the application, we'll map the routes to the views in this app.
Next, we need to update the urls.py file in the project folder to include the api routes/urls. I have kept it '' or base route, it could be anything as per your application design.
# project_name / urls.py

from django.contrib import admin
from django.urls import path, include

urlpatterns = [
    path('admin/', admin.site.urls),
    path('api/', include('app_name.urls')),
]
After configuring the URLs we need to set up the templates and static files.
Setting up Templates and Static files
To set up the templates, we need to configure the settings.py file to look for the templates in a specific directory. Below is the snippet to change the default configuration.
# project_name / settings.py

import os

TEMPLATES = [
    {
        'BACKEND': 'django.template.backends.django.DjangoTemplates',
        'DIRS': [os.path.join(BASE_DIR, 'templates'),],
        'APP_DIRS': True,
        'OPTIONS': {
            'context_processors': [
                'django.template.context_processors.debug',
                'django.template.context_processors.request',
                'django.contrib.auth.context_processors.auth',
                'django.contrib.messages.context_processors.messages',
            ],
        },
    },
]
So, you can now create your templates (HTML documents) inside the templates folder after creating the folder in the base project directory.
TO configure static files, we need to also make modifications to the settings.py file as follows:
# project_name / settings.py
# import os

STATIC_URL = '/static/'
STATICFILES_DIRS = [os.path.join(BASE_DIR, "static")]
STATIC_ROOT  = os.path.join(BASE_DIR, 'staticfiles')
Here, we are configuring the static files ( CSS, Js, Assets) in the static folder. This can be anything you like but the folder name should be then changed accordingly. Similar to the Templates folder, the static folder is also located in the root directory of the project.
This is all the necessary configuration for simple full stack application you can make, still we have to configure the backend and write the actual logic for the application. We'll move on to the second part of this section i.e. creating the CRUD API.
Making an CRUD API
There are certain things to be planned before we move ahead like the selection of database, the schema of the database and basically the structure of the backend. For now, we'll go with SQL database, a REST API with PostgreSQL hosted locally on the system.
Configure the database
To configure the database, we simply need to first create the database. This can be done by using a CLI or the Admin interface of the particular database we are working with in our case it's PostgreSQL. Postgres comes with pgAdmin to create and manage the databases and the server locally. The detailed explanation of the database creation is explained in the previous parts of the series.
After creating the database locally, you need to tweak the settings.py file database configuration object as per your credentials of the database instance.
# project_name / settings.py

DATABASES = {
    'default': {
        'ENGINE': 'django.db.backends.postgresql',
        'NAME': 'blogapp',
        'USER': 'postgres',
        'PASSWORD': '@1234567',
        'HOST': 'localhost',
        'PORT': '5432',
    }
}
If you have already created the databse, there is no problem in reusing the same one but for production level applications make sure to keep things separate. Also the model name has to be distinct in each app to create tables in the database.
Creating Model
We can now finally move on to the logic of the application, this is the part which acts as the backbone of backend development in django. You need to design the model carefully and programmatically. Make sure to include most of the logic as you can inside the models as it is a standard and a good practise to develop in professional projects.
For this app, we simply are going to create a blog post model. We are going to have some simple attributes and structure.
# app_name / models.py

from django.db import models
from django.contrib.auth.models import User

class Article(models.Model):
    title = models.CharField(max_length=127, verbose_name="headling")
    post = models.TextField(verbose_name='content')
    author = models.ForeignKey(User, on_delete=models.CASCADE)
    created = models.DateTimeField(auto_now_add=True)
    updated = models.DateTimeField(auto_now=True)

    def __str__(self):
        return self.title

    class Meta:
        verbose_name_plural = 'Articles'
This is again a simple model for demonstration of a lot of things like the str function, Meta class, verbose_names and so on. You can design models as per your requirements and proper planning. It really determines the structure of an application.
Now, after we have created the models, we need to migrate the schema into the database. Remember it acts as a checkpoint in the history of changes to the database.
python manage.py makemigrations
This will create a checkpoint in the migrations folder in the app.
To make changes to the database, we use the migrate command.
python manage.py migrate
Here's a quick demonstration of everything covered so far.

Creating Form
Django has a functionality to convert the fields in a model to a form which can be used for input in the frontend side. This allows us to just configure the Form and map the form to a view for the specific operation and simply add a tiny snippet of HTML to make a basic API and thus handle the entire heavy lifting.
Model Forms are the type of forms in django that does the above mentioned functionality. We need to create a form class in a new file inside the app called forms.py and add the following content:
# app_name / forms.py

from django import forms
from .models import Article

class ArticleForm(forms.ModelForm):
    class Meta:
        model = Article
        fields = [
            'title',
            'post',
        ]
In this snippet, we are creating a Form called ArticleForm it can be anything but (Model_NameForm) is a standard way to name a Model Form. It is a child class of the ModelForm, i.e. it inherits the parent's attributes/properties and methods. So we have the access to it's Meta class which defines some of the attributes like model, fields, etc.
Here, we are only adding title and post, because created and updated are automatically added. So what about author? Well, we can add it automatically by processing the request that will be sent when the form is submitted (we'll discus while creating views).
In a model form, we also have other attributes like exclude which is the opposite of fields, say you have a lot of attributes in a model and you want to skip certain fields then you don't use fields and use exclude to specify only the attributes to be excluded. Also widgets which can be used to style and properly process the fields in the form to have more control on how the form should be validated and presented.
Updating Models
Now, when we have chosen to use Model Form, we need to update the model logic (not the structure so no migrations).
We'll have to add some methods and redefine certain default parameters in able to use the Class based views and Model forms to the fullest strength.
# app_name / models.py

from django.db import models
from django.contrib.auth.models import User
from  django.core.serializers import serialize
import json

class ArticleQuerySet(models.QuerySet):
    def serialize(self):
        list_value = list(self.values("id","author","title","post"))
        return json.dumps(list_value)

class ArticleManager(models.Manager):
    def get_queryset(self):
        return ArticleQuerySet(self.model,using=self._db)

class Article(models.Model):
    title = models.CharField(max_length=127, verbose_name="heading")
    post = models.TextField(verbose_name='content')
    author = models.ForeignKey(User, on_delete=models.CASCADE)
    created = models.DateTimeField(auto_now_add=True)
    updated = models.DateTimeField(auto_now=True)

    objects = ArticleManager()

    def __str__(self):
        return self.title

    def serialize(self):
        data = {
            "id": self.id,
            "title": self.title,
            "author": self.author.id,
            "post": self.post,
        }
        data = json.dumps(data)
        return data

    class Meta:
        verbose_name_plural = 'Articles'
Let's break down what was added:
-
Created two new classes (
ArticleManagerandArticleQuerySet) This was done to manage and serialize the model attributes. We need a standard like JSON to parse and return the data from the client to the server and vice versa. TheArticleQuerySetactually converts theQuerySetinto list and dumps into a json object. A QuerySet in Django is collection of SQL queries. -
Function serialize The serialize function actually converts the
QuerySetinto a JSON object which in turn is used as a utility function for the model. It returns the JSON object hence a serialized object from a queryset. -
Editing the object for the model The object for the model is re initialized as a object of the
ArticleManagerclass which in turn manages the and process the query set and returns the serialized object.That's all done from the models for the app and now we finally move to the views.
Creating Views
Now, we can start writing the views to actually add the CRUD functionality ourselves and slowly develop the frontend as well.
To start creating views, we need to import some built-in classes used for making APIs like the Django generic views. Some of the core views(classes based) for making a CRUD API include:
These views help in making the API in Django easily. We simply need to add the template name to add a customize the layout, make forms, define the sets of fields to input from the client and which fields to process by the server side.
Let's create them one by one and understand the structure of class based views.
Create View
This view as the name suggests is used for creating a entry in a model(database) or we can also say that it will act as the Create(POST request) in the CRUD API.
# app_name / views.py

from django.views.generic.edit import (
    CreateView,
    UpdateView,
    DeleteView )

from .models import Article
from .forms import ArticleForm

class ArticleCreateView(CreateView):
    model = Article
    form_class = ArticleForm
    success_url = '/api/'

    def form_valid(self, form):
        form.instance.author = self.request.user
        return super(ArticleCreateView, self).form_valid(form)
Here, we have created a Class based view called ArticleCreateView which inherits the CreateView class from the django.views.generic.edit module. Here as similar to the ArticleForm class, we have certain attributes to pass like the model, form class and the success url.
- The
modelsimply indicates to which table or model we are creating the view for. - The
form_classdenotes the ModelForm class we are using for the Create view. - The
success_urlis the url route to which to redirect after a successful POST request/form submission.
Remember we discussed about adding author field automatically from the request from the form. This process is carried out in the form_valid function. Form_valid is a helper built-in function to redirect to the success_url when the form data is being posted. Before actually doing that, we add the author field by setting it as the User by accessing the self.request object. The self.request object actually holds the meta-data about the request that is being sent to the API so we can access the User who is currently logged in.
Though we don't have a login system, we can assume the user is logged in with some user account. Now to handle certain exceptions we can add Mixins. We can use LoginRequiredMixin to only allow the form submission for logged in users and so on.
Update View
# app_name / views.py

class ArticleUpdateView(UpdateView):
    model = Article
    form_class = ArticleForm
    success_url = '/api/'

    def form_valid(self, form):
        form.instance.author = self.request.user
        return super(ArticleUpdateView, self).form_valid(form)
This is quite similar to the CreateView except we have to use UpdateView as the base model of the ArticleUpdateView the rest of the attributes remain the same and functioning of the form like pre-rendering the fields to edit are all managed by the UpdateView out of the box.
Delete View
# app_name / views.py

class ArticleDeleteView(DeleteView):
    model = Article
    form_class = ArticleForm
    success_url = '/api/'

    def form_valid(self, form):
        form.instance.author = self.request.user
        return super(ArticleDeleteView, self).form_valid(form)
Again, here we do not have to change anything as for attributes and the valid_form function. We'll see the details when we look at the templates.
List View
#app_name / views.py

class ArticleView(ListView):
    model = Article
    template_name = 'api/list.html'

    def get_context_data(self, **kwargs):
        context = super().get_context_data(**kwargs)
        context['articles'] = Article.objects.filter(author=self.request.user)
        return context
This view is for listing all the objects/articles for the current logged in author. If we want something like a homepage for all the articles, the thing is as simple as replacing
context['articles'] = Article.objects.filter(author=self.request.user)
by
context['articles'] = Article.objects.all()
You can even apply filters for fetching the latest post by Article.objects.filter().order_by("-created"). You get the idea. It boils down to simple python and library function.
Also, we have a new attribute template_name which allows us to use the data in our custom template. In this case we will create the template in the templtes/api/ folder called list.html. The function get_context_data is used to fetch the objects from the database and return it as a special dictionary(JSON object) called context which can be rendered in the templates by the key in this case, the articles key will give us all the articles by the current user.
Detail View
# app_name / views.py

class ArticleDetailView(DetailView):
    model = Article
    template_name = 'api/post.html'
As opposite to the ListView, we have the DetailView that renders the details of the particular article. Here we don't have to write the get_context_data function as the default object for accessing the model data is object. So, we simply need to specify the template_name and the model. Here, the template is api/post.html in the templates folder.
Mapping the URLS
After completing the views, we can map those into a urls to access them as endpoints in the api app. Let's build upon the urls.py file that we created with no url paths.
# app_name / urls.py

from django.urls import path
from .views import (
        ArticleView, ArticleDetailView, ArticleCreateView,
        ArticleUpdateView, ArticleDeleteView
        )

urlpatterns = [
        path('', ArticleView.as_view(), name="listpost"),
        path('article//', ArticleDetailView.as_view(), name="detailpost"),
        path('create/', ArticleCreateView.as_view(), name="createpost"),
        path('update//', ArticleUpdateView.as_view(), name="updatepost"),
        path('delete//', ArticleDeleteView.as_view(), name="deletepost"),
]
So, we can see the views are imported from the .views and are mapped to a particular route. We use .as_view function to take a request from a callable class based view and returns the processed response. The <pk> is the id for accessing a particular object. We use the id for detail view, update and delete views.
Creating Templates and Static files
We now, have to join the final piece of the puzzle i.e. to create templates. It's quite simple but requires a bit of logic to connect things together. The backend is handled flawlessly by Model Form and Generic views, we simply need to put simple HTML and Django templating language to its correct use.
# templates / index.html


    Django Blog
    {% load static %}


    Articles
   {% block body %}
   {% endblock %}
A simple HTML doc with link to a stylesheet. We also have a block to further inherit this as the base template.
# static / css / style.css

body
{
    background-color:#1d1dff;
    color:white;
}

h1
{
    text-align:center
    font-family: monospace;
}
a{
    text-decoration-color: #00ffff;
    color: #ff6600;
}

p
{
    color:#ff6600;
    font-weight:500;
}

ul
{
    list-style-type:square;
}
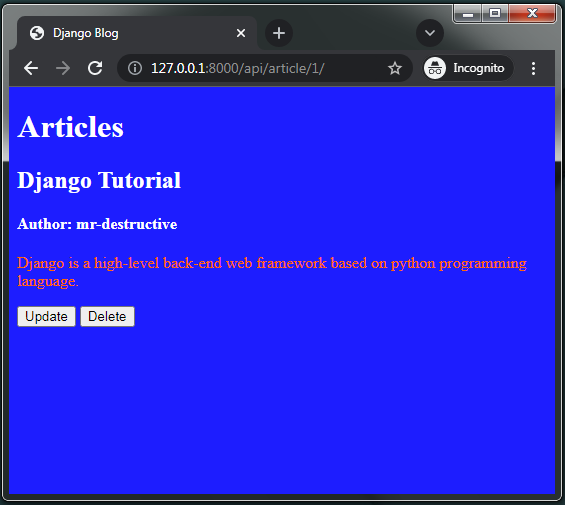
The below template is a detail view page, that renders the details of the article. We are using the object key from the context dictionary provided by default as mentioned here. We are also embedding the Update and Delete buttons to manage the Article.
This is the time to explain about the dynamic urls in Django. We have used the {% url 'updatepost' object.id %} to create a dynamic url that will redirect to the updatepost url and parse with it the id of the object. This is important as the url itself takes the <pk> value to update the post. So we just pass the id like a parameter to the URL. This is the way we create dynamic urls in Django templates which is quite similar to static file urls.
# templates / app_name / post.html
{% extends 'index.html' %}
{% block body %}
{{ object.title" }}
{{ object.post"
{% endblock %}
We have used the dynamic URLs in Update and Delete View buttons.
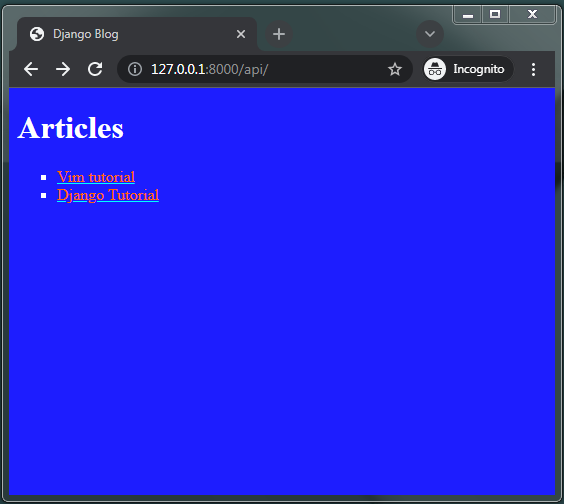
The below template is for creating a home page like structure but for the current logged in user. We are displaying all the articles of the logged in the form of a list with a for loop as discussed in the templating tutorial part. We have access to the key articles from the dictionary context and hence we iterate over the loop from that object and display the title with the url for the post detail view.
Here as well we are using the dynamic url by parsing the article.id as the <pk> primary key to the url.
# templates / app_name / list.html
{% extends 'index.html' %}
{% block body %}
{% for article in articles %}
- {{ article.title }}
{% endfor %}
{% endblock %}
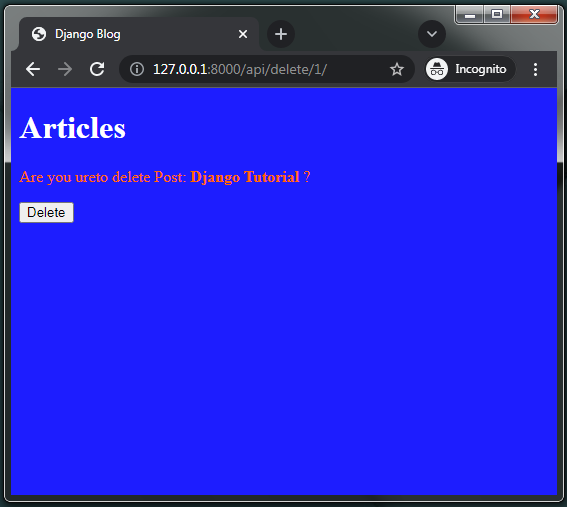
# templates / app_name / article_confirm_delete.html
{% extends 'index.html' %}
{% block body %}
# templates/ app_name / article_form.html
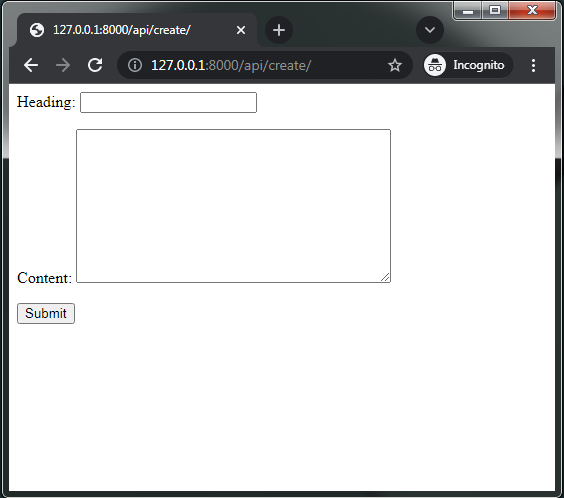
This is the template that forms the basis for all the forms like Create and Update. We use the template variable {{ form }} to render the form in the template. Additionally we use .as_p to make the form fields as a paragraph tag in HTML. The {% csrf_token %} is the Cross site forgery token allowing secure posting of a form. Don't bother about it much it is important for identifying the user posting the data from the site. The final piece of element is the submit button used to submit the form.
For any references, you can take a look at the GitHub repository for the CRUD API in pure Django.
Conclusion
So, from this section, we were able to create a CRUD API in pure Django. This should be the end of the core series of Django Basics, but there are more parts coming up still which are not basics but still worth learning as a beginner. We'll further explore DRF, Forms, CORS, etc. We'll see some other libraries specific for Django. Hopefully from this tutorial series, you were able to learn something and if you have any queries or issues please let me know.
Thank you for reading, please provide feedback on how you felt about the series. Though the series is not over, it's sufficient for a beginner to get pace in Django. Hope you had a great time. Happy Coding :)