
Introduction
This is a guide and a walkthrough of how to quickly set up a base Django project with Auth0 as integration for authentication and authorization. I will walk you through the Django setup and how to use and integrate the functionalities of the Auth0. I will also discuss how why you should be using Auth0 and why I love it.
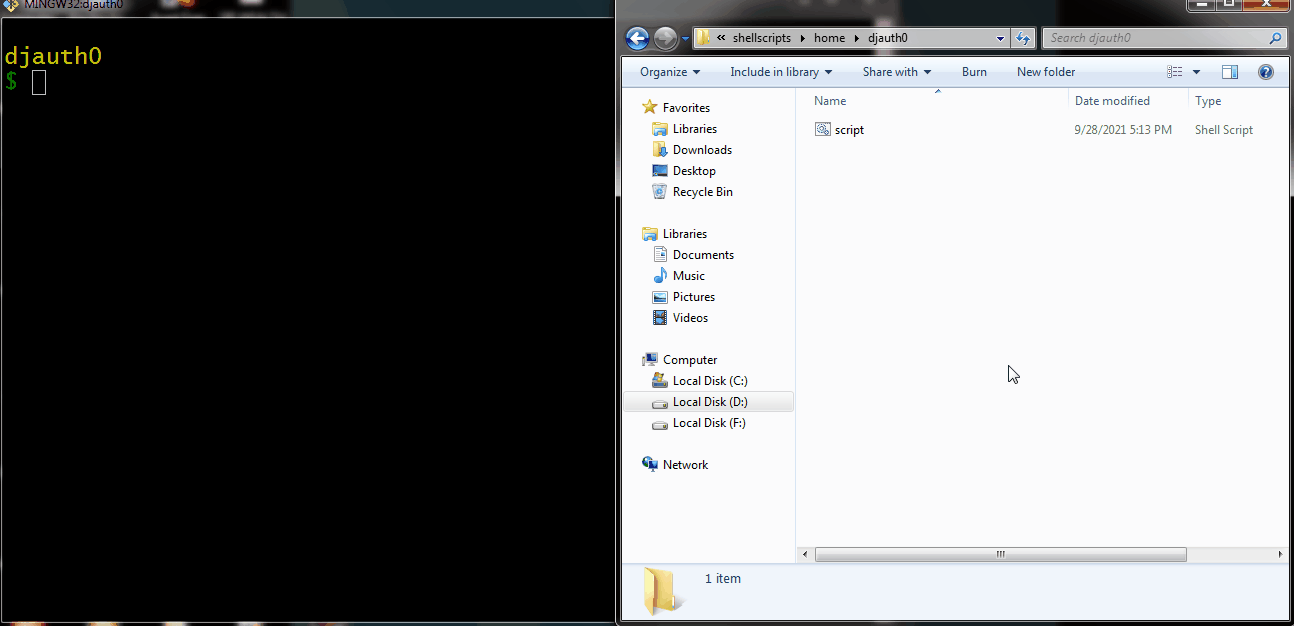
The script takes 2:44 minutes time to do everything from scratch. From installing virtualenv in python to integrating the Auth0 application.
Here's how the script works:
Contents
- What is Auth0
- Why I love Auth0
- Set up a Django Project
- Integrate Auth0 to a Django project
- Creating a BASH Script for integrating Auth0
- Complete BASH Script
- Conclusion
What is Auth0
Auth0 (Auth zero) is a platform that provides easy authentication and authorization for a number of platforms in various programming languages and frameworks. The easy-to-follow documentation, availability for almost all web frameworks across platforms make it a big bonus for developers. They actually make the Developer experience flawless and beginner-friendly.
According to Auth0,
They make your login box awesome
And how true is that they make things pretty convenient and wicked fast to integrate a smooth functional backend for authentication and authorization. Of course, there are more things they offer than just making authentication systems but it is by far what the world knows them for.
Why I love Auth0
Auth0 is a generous company that provides a free tier for a limited capacity of authentication and that might be more than enough for a developer getting its feet wet in the web development (backend).
They even provide a nice user interface out of the box for login/signup and even a dashboard ready-made, which is quite a lot of heavy lifting already done for you. Also, there is a dashboard for analyzing the number of sign-in/logins into the particular app. This provides the admin/developer of the app to get a closer look at the user registered in a day/week/months, number of active users, and so on.
So, who would not love it? I am willing to write and use their service for some of my projects. I already have used one for the Hashnode x Auth0 Hackathon, I made devquotes using the authentication of Auth0 in my Django application.
Set up a Django Project
If you are reading this you already know how to set up a Django project, I assume. But nevertheless, I can just include a quick introduction on how to do it. I have a script to do this.
#!/usr/bin/env bash mkdir $1 cd $1 pip install virtualenv virtualenv env source env\bin\activate pip install django django-admin startproject $1 . clear
You can check out Django Quick Setup Script for the details of this script and also a more in-depth guide of Django project setup.
But if you want to understand the basics of the Django project setup here is a little guide about it:
Firstly, create a virtual environment, it's not mandatory but it keeps things simple and easy for your project in correspondence to the entire OS. So in python, we have a module to create the virtual environment pretty easily,
pip install virtualenv
You can use pip3 or pip -m, or however you install normal python modules. This just installs the python virtual environment, we need to create one in the current folder, so for that navigate to the folder where you want to create the project and enter the following command:
virtualenv venv
Here, venv can be anything like env just for your understanding and simplicity it's a standard name kept for the same. After this, you will see a folder of the same name i.e. venv or any other name you have used. This is the folder where python will keep every installation private to the local folder itself. Now, we need to activate the virtual environment, for that we can use the command :
# for Linux/macOS : source venv/bin/activate
# for Windows: venv\Scripts\activate
After this, your command prompt will have a (venv) attached to its start. This indicates you are in a virtual environment, things you do here, may it be module installation or any configuration related to python will stay in the local folder itself.
After the virtual environment is set up and activated, you can install Django and get started with it. Firstly, install Django using pip:
pip install django
After the installation is completed, you can start a Django project in the current folder using the command:
django-admin startproject name
Here name can be your project name. After this, you will see one new folder and one file pop up.
Namely, the project named folder and manage.py file. So you don't have to touch the manage.py file but we use it in most of the commands to use the Django functionalities.
You can now run your basic server using the command :
python manage.py runserver
There is a base installed/setup of the Django project. Moving on in integrating the Auth0 login functionality in our webpage.
Integrate the Auth0 app in your project
So, for integrating the Auth0 app for your web application, you need to have an Auth0 account, you can signup here. After this you can create an Auth0 application for any type of application, we have a couple of options:
- Native Application
- Single Page Application
- Regular Web Application
- Machine to Machine Application
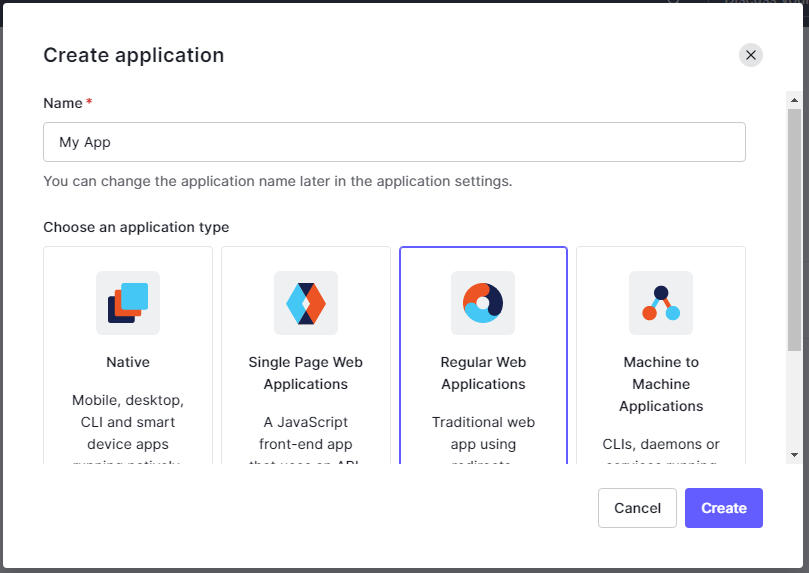
You can choose as per your needs, but mostly it would be a Regular Web application if you have a backend like Django, Nodejs, PHP, or other types of frameworks and languages. So, moving ahead we have created an application for the Django framework as a backend. Now, we have a Settings tab in the application dashboard, where we have different credentials for the Auth0 app to talk to our application.
The credentials needed to be stored safely are:
- domain
- Client ID (Key)
- Client Secret
This has to be secured for our local application which will go into production when ready. You can use several options like dotenv, environment variables, and so on when the application is being deployed but for now, let's hardcode them in our Django project.
Now, you can follow the simple straightforward procedure to copy-paste your credentials from the Auth0 official documentation. It's quite straightforward to follow the steps even for a beginner.
After the Auth0 app has been configured following the procedure in the documentation, you need to integrate several files like dashboard and index templates into your custom templates.
Following additional changes are also to be made if you have a user-defined app for your Django project.
In the auth0login app, view.py file:
- The
indexfunction renders the base file for your project if the user is logged in. - The
dashboardfunction renders the baked version of your profile/dashboard of users on your app.
You would also need to add the root URIs of your app that you will be using for testing or in production. For example, we can add http://127.0.0.1:8000 to allow and use Auth0 in our development environment locally.
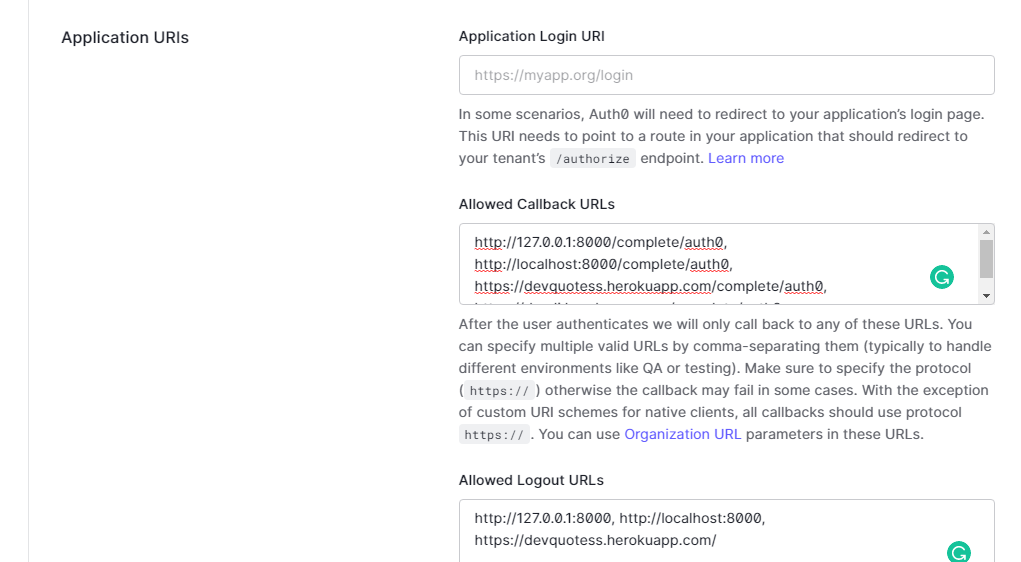
You also need to specify the callback URLs for your application which is /complete/auth0 by default.
Creating a BASH Script for integrating Auth0
So, we can now dive into creating the BASH Script to set up the Django x Auth0 application in minutes. The script is quite large, like 200 lines but don't worry! Its automation reduces the pain of integrating a User Authorization flawlessly. I am also thinking of adding the cURL command and parsing in the Client ids, keys, and secret keys, etc.
Appending to a file
We can use the cat command to append text to a file, using the syntax as below:
cat << EOF >> filename text more text EOF
Remember here EOF is just a label to stop the command and save it to the file.
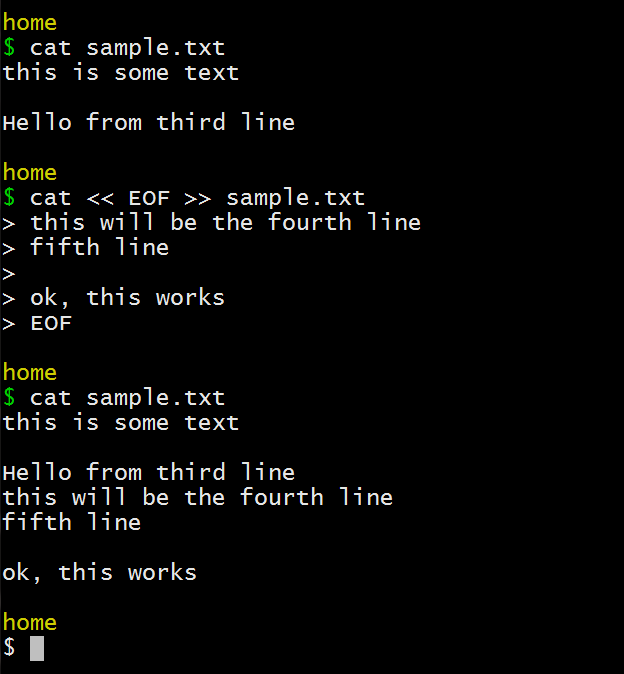
So, we can see that we were able to append to a file, multiple lines using the cat command.
We have used this concept in adding configuration and credentials to the settings.py or the urls.py files.
Adding text before a particular line using sed
sed is a great command, and there is nothing you can't do with it, OK there might be exceptions. We can get write to a file directly (don't display the output) and specify the line number before which we want to append the text. We can then add the text we want and followed by the filename.
sed -i '33 i sometext here' filename
Here, 33 is the line number in the file which we want to insert before. We have used '"' to add a ' inside a ', this might feel a bit wired but that is how it is in BASH.
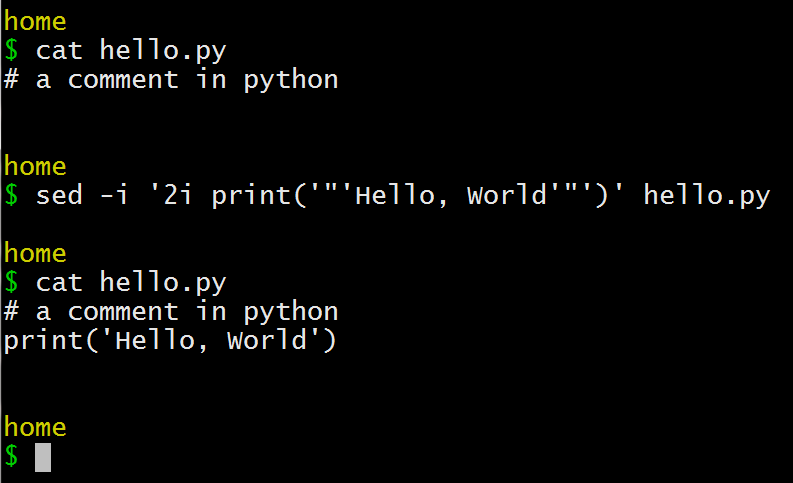
Let's say you want to add print('Hello, World!') to a particular line, we have to enclose ' with these "'( double and single quotes),
sed -i '2i print('"'Hello, World'"')' hello.py
This will add the line print('Hello World') to the file hello.py
Appending to a line using sed
We can even append text to a particular line using sed, we can use some escape characters and regex to add the text from the end of the line.
sed -i '2i s/$/ textgoes here /' filename
Here 2 is any number of line you want to add text to, next i a prompt for inserting text and then we have regex like s/$/ /, this will put the text enclosed in / / to the end of the line as indicated by $. We have the filename at its usual place as before.
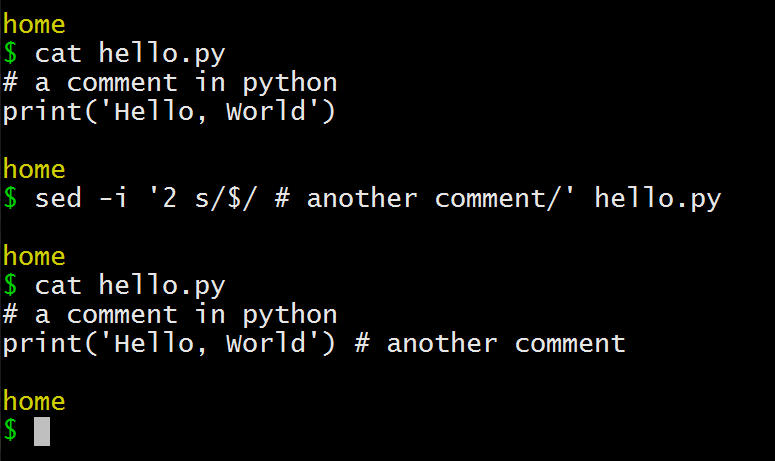
So, lets say, I want to add a comment to the second line in the previous example, I can use the following command to do it:
sed -i '2 s/$/ # another comment/' hello.py
We have used these commands to add the include function in the urls.py in the project folder.
So those were all the operations we used for doing some automated editing for the Auth0 app integration to our Django project.
Below is the entire script and is also uploaded on GitHub.
Complete BASH Script
You can run the file by parsing the name of your project.
bash script.sh mywebsite
Wait for some 2-3 minutes, and the script will produce the Django application with the Auth0 app integrated. You will have to enter the credentials manually wherever applicable.
#!/usr/bin/env bash mkdir $1 cd $1 pip install virtualenv virtualenv venv source venv/Scripts/activate pip install django django-admin startproject $1 . cat << EOF >> requirements.txt social-auth-app-django~=3.1 python-jose~=3.0 python-dotenv~=0.9 EOF pip install -r requirements.txt pip freeze > requirements.txt python manage.py startapp auth0login touch auth0login/urls.py mkdir auth0login/templates touch auth0login/templates/index.html touch auth0login/templates/dashboard.html sed -i '40 i \ '"'"'social_django'"'"',' $1/settings.py sed -i '41 i \ '"'"'auth0login'"'"',' $1/settings.py sed -i '21 i \ path('"''"', include('"'auth0login.urls'"')),' $1/urls.py sed -i '17 s/$/, include/' $1/urls.py cat << EOF >> $1/settings.py SOCIAL_AUTH_TRAILING_SLASH = False # Remove trailing slash from routes SOCIAL_AUTH_AUTH0_DOMAIN = 'YOUR_DOMAIN' SOCIAL_AUTH_AUTH0_KEY = 'YOUR_CLIENT_ID' SOCIAL_AUTH_AUTH0_SECRET = 'YOUR_CLIENT_SECRET' EOF cat << EOF >> $1/settings.py SOCIAL_AUTH_AUTH0_SCOPE = [ 'openid', 'profile', 'email' ] EOF python manage.py migrate cat << EOF >>auth0login/auth0backend.py from urllib import request from jose import jwt from social_core.backends.oauth import BaseOAuth2 class Auth0(BaseOAuth2): """Auth0 OAuth authentication backend""" name = 'auth0' SCOPE_SEPARATOR = ' ' ACCESS_TOKEN_METHOD = 'POST' REDIRECT_STATE = False EXTRA_DATA = [ ('picture', 'picture'), ('email', 'email') ] def authorization_url(self): return 'https://' + self.setting('DOMAIN') + '/authorize' def access_token_url(self): return 'https://' + self.setting('DOMAIN') + '/oauth/token' def get_user_id(self, details, response): """Return current user id.""" return details['user_id'] def get_user_details(self, response): # Obtain JWT and the keys to validate the signature id_token = response.get('id_token') jwks = request.urlopen('https://' + self.setting('DOMAIN') + '/.well-known/jwks.json') issuer = 'https://' + self.setting('DOMAIN') + '/' audience = self.setting('KEY') # CLIENT_ID payload = jwt.decode(id_token, jwks.read(), algorithms=['RS256'], audience=audience, issuer=issuer) return {'username': payload['nickname'], 'first_name': payload['name'], 'picture': payload['picture'], 'user_id': payload['sub'], 'email': payload['email']} EOF cat << EOF >> $1/settings.py AUTHENTICATION_BACKENDS = { #'YOUR_DJANGO_APP_NAME.auth0backend.Auth0', 'django.contrib.auth.backends.ModelBackend' } EOF cat << EOF >> $1/settings.py LOGIN_URL = '/login/auth0' LOGIN_REDIRECT_URL = '/dashboard' EOF cat > auth0login/views.py<<EOF from django.shortcuts import render, redirect from django.contrib.auth.decorators import login_required from django.contrib.auth import logout as log_out from django.conf import settings from django.http import HttpResponseRedirect from urllib.parse import urlencode import json def index(request): user = request.user if user.is_authenticated: return redirect(dashboard) else: return render(request, 'index.html') @login_required def dashboard(request): user = request.user auth0user = user.social_auth.get(provider='auth0') userdata = { 'user_id': auth0user.uid, 'name': user.first_name, 'picture': auth0user.extra_data['picture'], 'email': auth0user.extra_data['email'], } return render(request, 'dashboard.html', { 'auth0User': auth0user, 'userdata': json.dumps(userdata, indent=4) }) def logout(request): log_out(request) return_to = urlencode({'returnTo': request.build_absolute_uri('/')}) logout_url = 'https://%s/v2/logout?client_id=%s&%s' % \ (settings.SOCIAL_AUTH_AUTH0_DOMAIN, settings.SOCIAL_AUTH_AUTH0_KEY, return_to) return HttpResponseRedirect(logout_url) EOF cat << EOF >> auth0login/templates/index.html <div class="login-box auth0-box before"> <img src="https://i.cloudup.com/StzWWrY34s.png" /> <h3>Auth0 Example</h3> <p>Zero friction identity infrastructure, built for developers</p> <a class="btn btn-primary btn-lg btn-login btn-block" href="/login/auth0">Log In</a> </div> EOF cat << EOF >> auth0login/templates/dashboard.html <div class="logged-in-box auth0-box logged-in"> <h1 id="logo"><img src="//cdn.auth0.com/samples/auth0_logo_final_blue_RGB.png" /></h1> <img class="avatar" src="{{ auth0User.extra_data.picture }}"/> <h2>Welcome {{ user.username }}</h2> <pre>{{ userdata }}</pre> </div> EOF cat << EOF >> auth0login/urls.py from django.urls import path, include from . import views urlpatterns = [ path('', views.index), path('dashboard', views.dashboard), path('logout', views.logout), path('', include('django.contrib.auth.urls')), path('', include('social_django.urls')), ] EOF python manage.py makemigrations python manage.py migrate
Conclusion
Ok, so this was it, a quite big script but that's how automation can be. We were able to set up a Django base application with a ready app of Auth0 to extend the functionality. This was just a basic script also you can extend the functionalities like adding a curl command to fetch the credentials and make it more automated but that was not the aim of this article.
If you had any issues using the script please let me know, I'll be happy to fix those. Thanks for reading. Happy Coding :)